前言
本文主要是在学习Spring6时的知识点拾遗,涉及多个方面,内容较为基础
原文地址:https://xuedongyun.cn/post/386/
Spring是如何创建对象的(xml)
- 调用了无参构造器创建对象
dom4j解析beans.xml文件,从中获取类的全类名- 通过反射机制调用无参数构造方法创建对象
1
2
| Class clazz = Class.forName("com.example.spring6.User");
Object object = clazz.getDeclaredConstructor().newInstance();
|
- bean最终存储在spring容器中,底层是一个map。map在
DefaultListableBeanFactory类中- key:
String,默认是类名首字母小写 - values:
BeanDefinition , 存的是类的定义(描述信息)
BeanDefinition
每一个被扫描到的bean都会生成一个BeanDefinition。描述一个bean的全部信息,比如他的class类型、Bean的作用域、是否懒加载…
BeanDefinition的常见属性:
beanClass:表示Bean类型,未加载类的时候存放Bean的名字,加载类后存放Bean的class信息。scope:表示Bean的作用域,一般值为单例或者原型。lazyInit:表示Bean是否是懒加载。initMethodName:Bean初始化需要执行的方法。destroyMethodName:Bean销毁时要执行的方法。factoryBeanName:创建当前Bean的工厂。
1
2
3
4
5
| public class DefaultListableBeanFactory extends AbstractAutowireCapableBeanFactory
implements ConfigurableListableBeanFactory, BeanDefinitionRegistry, Serializable {
private final Map<String, BeanDefinition> beanDefinitionMap = new ConcurrentHashMap<>(256);
}
|
什么是控制反转(IoC)和依赖注入(DI)
控制反转
- 是一种思想
- 为了降低程序耦合,提高扩展能力
- 反转的是什么
- 对象的创建权,交由第三方容器负责
- 对象之间关系的维护权,交由第三方容器负责
- 如何实现的:依赖注入
依赖注入
- 依赖注入实现了控制反转
- Spring中,对象创建的过程中,将对象依赖属性通过配置进行注入
- 常见依赖注入方式
IOC容器在Spring中的实现
Spring中的IoC容器:IoC思想的具体实现,管理的组件叫Bean。
BeanFactory:IoC 容器的基本实现,Spring内部使用的接口ApplicationContext:子接口,提供了更多高级特性,面向 Spring 的使用者
ApplicationContext的主要实现类:
| 类型名 | 简介 |
|---|
ClassPathXmlApplicationContext | 通过读取类路径下的 XML 格式的配置文件创建 IOC 容器对象 |
FileSystemXmlApplicationContext | 通过文件系统路径读取 XML 格式的配置文件创建 IOC 容器对象 |
ConfigurableApplicationContext | ApplicationContext 的子接口,包含一些扩展方法 refresh() 和 close() ,让 ApplicationContext 具有启动、关闭和刷新上下文的能力。 |
WebApplicationContext | 专门为 Web 应用准备,基于 Web 环境创建 IOC 容器对象,并将对象引入存入 ServletContext 域中。 |
获取Bean时的类型判断
根据类型来获取Bean时,实际使用的是instanceof。也即,在满足Bean唯一条件下,我们可以拿到子类型的Bean
@Autowired和@Resource的区别
@Autowired | @Resource |
|---|
| Spring框架的注解 | JDK扩展包javax.annotation-api中的注解 |
| 默认byType注入;若要根据名称,需使用@Qualifier注解 | 默认byName注入,没有指定name时把属性名当做name;根据name找不到时,才会byType注入 |
| 属性,setter,方法,构造函数 | 属性,setter |
Bean的生命周期
Bean的生命周期
- bean对象创建(调用无参构造器)
- 为bean对象设置属性
- bean的后置处理器(初始化之前)
- bean对象初始化(需在配置bean时指定初始化方法)
- bean的后置处理器(初始化之后)
- bean对象就绪(可以使用了)
- bean对象销毁(需在配置bean时指定销毁方法)
- IoC容器关闭
1
2
3
4
5
6
7
8
9
10
11
12
| @Component
public class User {
public void initMethod(){
System.out.println("生命周期:初始化");
}
public void destroyMethod(){
System.out.println("生命周期:销毁");
}
}
|
1
2
3
4
5
6
7
8
9
10
11
12
13
| @Component
public class User {
@PostConstruct
public void initMethod(){
System.out.println("生命周期:初始化");
}
@PreDestroy
public void destroyMethod(){
System.out.println("生命周期:销毁");
}
}
|
1
2
3
4
5
6
7
8
9
10
11
12
13
14
15
|
@Component
public class MyBeanProcessor implements BeanPostProcessor {
@Override
public Object postProcessBeforeInitialization(Object bean, String beanName) throws BeansException {
System.out.println("生命周期:后置处理器,初始化之前");
return bean;
}
@Override
public Object postProcessAfterInitialization(Object bean, String beanName) throws BeansException {
System.out.println("生命周期:后置处理器,初始化之后");
return bean;
}
}
|
配置initMethod和destroyMethod的几种方法:
@PostConstruct注解和@PreDestroy注解xml方式:<bean class="xxx" init-method="initMethod" destroy-method="destroyMethod">@Bean注解方式:@Bean(initMethod = "initMethod", destroyMethod = "destroyMethod")
FactoryBean
FactoryBean是Spring提供的一种整合第三方框架的常用机制。配置一个FactoryBean类型的bean,在获取bean的时候得到的是getObject()方法的返回值。
Mybatis就是通过FactoryBean机制来创建SqlSessionFactory对象的
1
2
3
4
5
6
7
8
9
10
11
12
|
public class UserFactoryBean implements FactoryBean<User> {
    @Override
    public User getObject() throws Exception {
        return new User();
    }

    @Override
    public Class<?> getObjectType() {
        return User.class;
    }
}
|
1
| User user = context.getBean("userFactoryBean", User.class);
|
AOP
代理模式
二十三种设计模式的一种。调用目标方法,需要先经过代理,由代理对象调用目标方法。可以让不属于目标方法的逻辑剥离出来,解耦。
静态代理
原本的类,用于计算
1
2
3
4
| public interface Calculator {
int add(int i, int j);
}
|
1
2
3
4
5
6
7
8
9
| public class CalculatorImpl implements Calculator{
@Override
public int add(int i, int j) {
int result = i + j;
System.out.println("result = " + result);
return result;
}
}
|
静态代理模式,将被代理的对象声明为成员变量
1
2
3
4
5
6
7
8
9
10
11
12
13
14
15
16
17
18
| public class CalculatorStaticProxy implements Calculator{
private Calculator target;
public CalculatorStaticProxy(Calculator target) {
this.target = target;
}
@Override
public int add(int i, int j) {
System.out.println("方法执行前");
int result = target.add(i, j);
System.out.println("方法执行后");
return result;
}
}
|
调用方法
1
2
3
| Calculator calculator = new CalculatorImpl();
Calculator staticProxy = new CalculatorStaticProxy(calculator);
int res = staticProxy.add(1, 2);
|
动态代理
使用Proxy.newProxyInstance来创建代理对象
1
2
3
4
5
6
7
8
9
10
11
12
13
14
15
16
17
18
19
20
21
22
23
24
25
26
|
public class ProxyFactory {
private Object target;
public ProxyFactory(Object target) {
this.target = target;
}
public Object getProxy() {
ClassLoader classLoader = target.getClass().getClassLoader();
Class<?>[] interfaces = target.getClass().getInterfaces();
InvocationHandler handler = new InvocationHandler() {
@Override
public Object invoke(Object proxy, Method method, Object[] args) throws Throwable {
System.out.println("方法执行前");
Object res = method.invoke(target, args);
System.out.println("方法执行后");
return res;
}
};
return Proxy.newProxyInstance(classLoader, interfaces, handler);
}
}
|
调用方法
1
2
3
4
| Calculator calculator = new CalculatorImpl();
ProxyFactory factory = new ProxyFactory(calculator);
Calculator proxy = (Calculator) factory.getProxy();
proxy.add(1, 2);
|
AOP概念
AOP(面向切面编程)是一种设计思想,是面向对象编程的一种补充。他通过预编译的方式和运行期间动态代理的方式实现。我们可以在不修改源代码的情况下,给程序统一添加额外的功能。
AOP相关术语
横切关注点
这是一个逻辑上的概念:分散在每个各个模块中解决同样的问题。比如用户验证,日志管理…

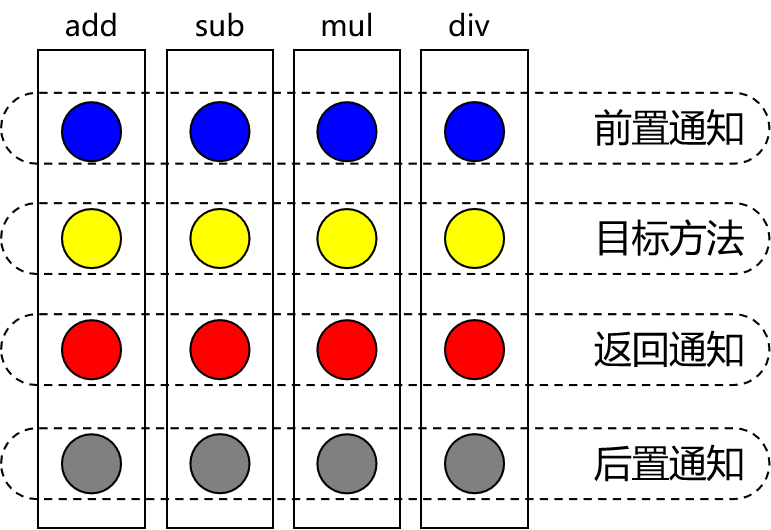
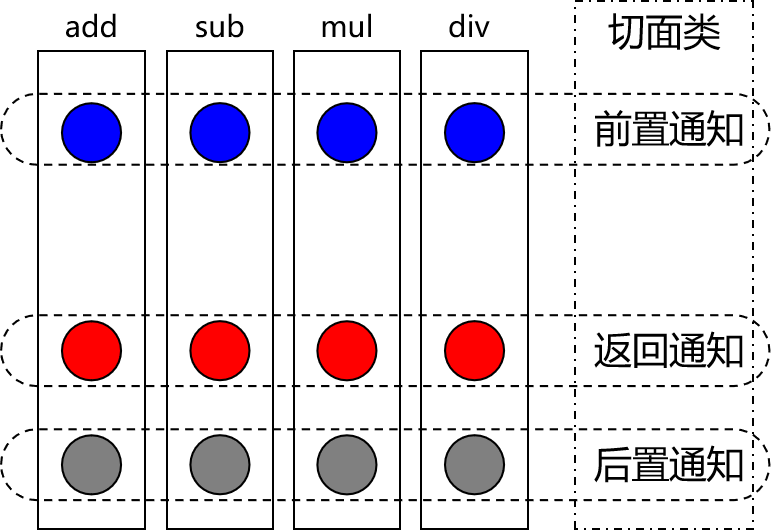
通知(增强)
横切关注点上要做的事情都,需要一个方法来实现,这样的方法就叫通知方法
- 前置通知:在被代理的目标方法前执行
- 返回通知:在被代理的目标方法成功结束后执行(寿终正寝)
- 异常通知:在被代理的目标方法异常结束后执行(死于非命)
- 后置通知:在被代理的目标方法最终结束后执行(盖棺定论)
- 环绕通知:使用try…catch…finally结构围绕整个被代理的目标方法,包括上面四种通知对应的所有位置
切面
封装通知方法的类
目标
被代理的目标对象
代理
目标对象应用通知后的代理对象
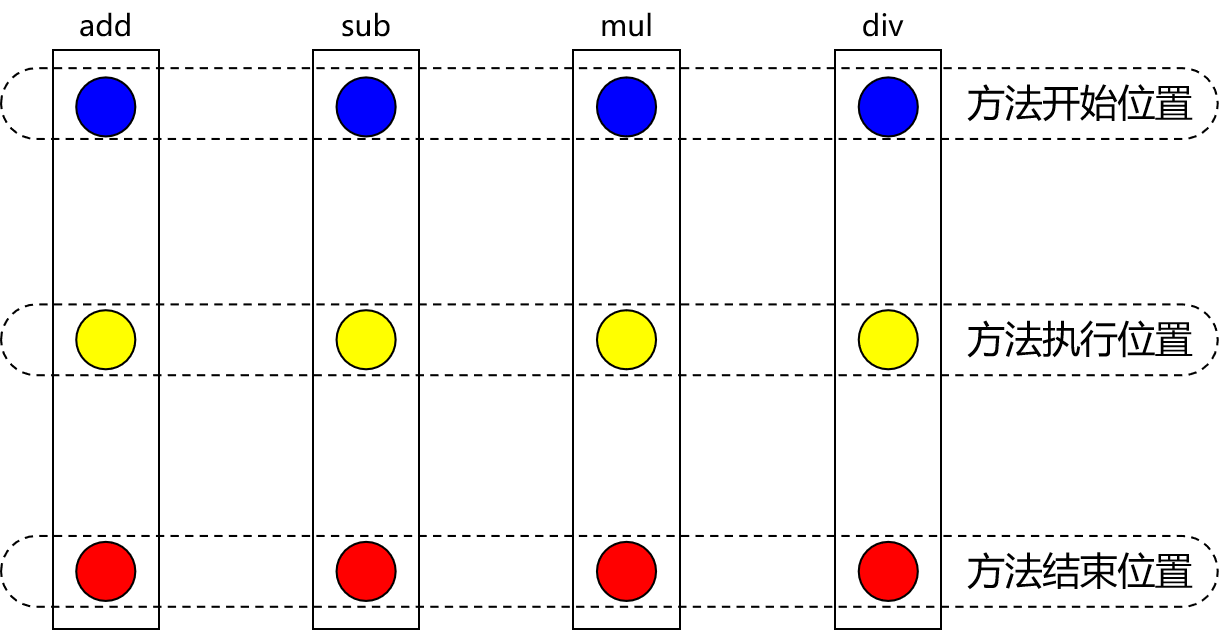
连接点
这是一个逻辑概念:把方法排成一排,每个横切位置看成x轴方向,方法由上到下执行的顺序看成y轴方向,x轴和y轴交叉点就是连接点。
简单来说:就是Spring允许你使用通知的地方
切入点
定位连接点的方式。每个类的方法都有多个连接点(连接点是客观存在的事物)
Spring的AOP技术可以通过切入点,定位到特定的连接点
基于注解的AOP
技术说明
graph TB;
    subgraph Spring基于注解的AOP;
        AspectJ注解层
        subgraph 具体实现层;
            动态代理
            cglib
        end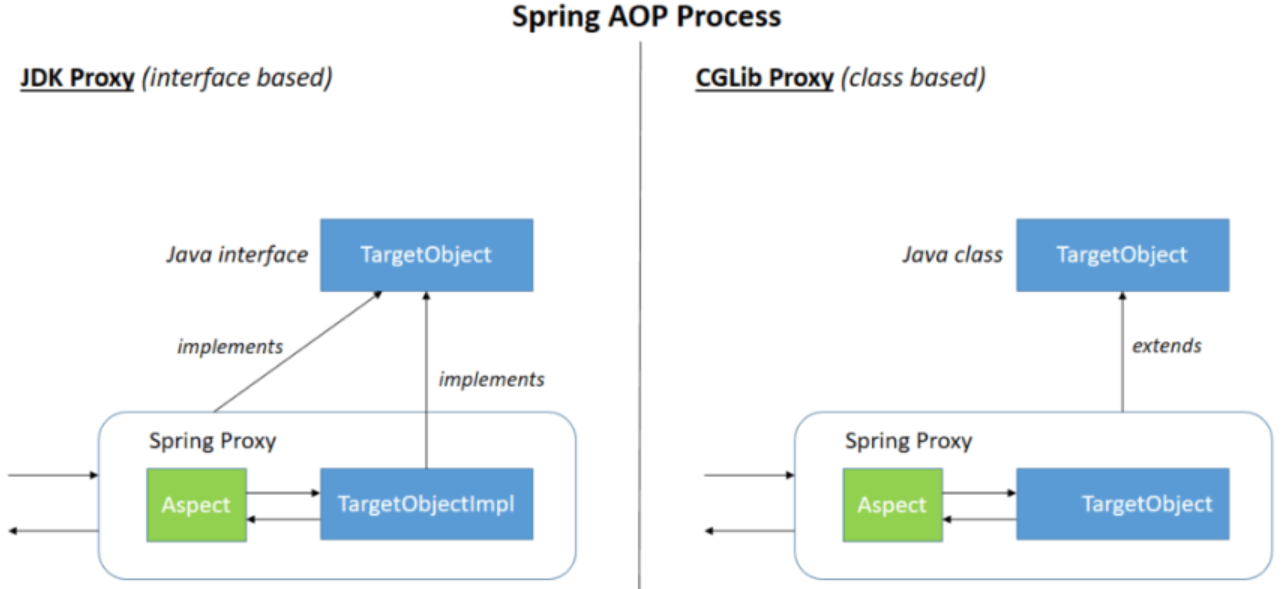
end动态代理分为JDK动态代理,cglib动态代理。有接口的情况可以使用JDK动态代理或cglib动态代理;没有接口只能使用cglib动态代理
- JDK动态代理:JDK原生的实现方式,被代理的目标类必须实现接口
- cglib动态代理:通过继承被代理的目标类实现代理,不需要目标实现接口
JDK动态代理生成的代理类会在com.sum.proxy包下,类名为$proxy1,和目标方法实现了相同的接口
cglib动态代理生成的代理类会和目标方法在相同的包下,会继承目标类
所需依赖
1
2
| spring-aop
spring-aspects
|
使用方式
配置切面类
1
2
3
4
5
6
7
8
9
10
11
12
13
14
| @Aspect
@Component
public class LogAspect {
@Before("execution(public int org.example.aop.CalculatorImpl.*(..))")
public void beforeMethod(JoinPoint joinPoint) {
Signature methodName = joinPoint.getSignature();
Object[] args = joinPoint.getArgs();
System.out.println("LogAspect.beforeMethod methodName=" + methodName + ", args=" + Arrays.toString(args));
}
}
|
各种通知
@Before:前置通知,目标方法执行前
1
2
| @Before("...")
public void beforeMethod(JoinPoint joinPoint)
|
@AfterReturning:返回通知,目标方法成功后
1
2
| @AfterReturning("...")
public void afterReturningMethod(JoinPoint joinPoint, Object result)
|
@AfterThrowing:异常通知,目标方法异常结束后
1
2
| @AfterThrowing("...")
public void afterThrowingMethod(JoinPoint joinPoint, Throwable ex)
|
@After:后置通知,目标方法最终结束后
1
2
| @After("...")
public void afterMethod(JoinPoint joinPoint)
|
@Around:环绕通知
1
2
3
4
5
6
7
8
9
10
| @Around("...")
public Object aroundMethod(ProceedingJoinPoint joinPoint) {
try {
result = joinPoint.proceed();
} catch (Throwable throwable) {
throwable.printStackTrace();
} finally {
}
return result;
}
|
执行顺序(5.3.x版本以后):前置通知->目标操作->返回通知/异常通知->后置通知
切入点表达式
补:
如果要明确返回值类型,必须写明权限修饰符
在方法参数列表部分,使用(int,..)表示参数列表以一个int类型的参数开头
重用切入点
声明切入点
1
2
| @Pointcut("execution(* org.example.aop.*.*(..))")
public void pointCut(){}
|
在同一个类中使用
在不同类中使用
1
| @Before("org.example.aop.CommonPointCut.pointCut()")
|
切面的优先级
使用@Order注解可以控制切面的优先级:
@Order(较小的数):优先级高,外面@Order(较大的数):优先级低,内层
事务
事务:一个数据库操作序列,这些操作要么全部执行,要么全部不执行
特性:ACID(原子性,一致性,隔离性,持久性)
jdbcTemplate
jdbcTemplate是Spring对JDBC的封装
所需依赖:
1
2
| spring-jdbc
mysql-connector-java
|
容器中配置jdbcTemplate
1
2
3
4
5
6
7
8
9
10
11
12
13
14
15
16
17
18
19
20
21
22
23
24
25
26
27
28
29
30
31
| @Configuration
@ComponentScan("org.example")
@EnableTransactionManagement
public class JdbcConfig {
@Bean
DataSource dataSource() {
HikariDataSource dataSource = new HikariDataSource();
dataSource.setJdbcUrl("jdbc:mysql://localhost:3306/flask?characterEncoding=utf8&useSSL=false");
dataSource.setUsername("root");
dataSource.setPassword("122599");
dataSource.setDriverClassName("com.mysql.cj.jdbc.Driver");
return dataSource;
}
@Bean
public DataSourceTransactionManager transactionManager(DataSource datasource) {
return new DataSourceTransactionManager(datasource);
}
@Bean
JdbcTemplate jdbcTemplate(DataSource dataSource) {
JdbcTemplate jdbcTemplate = new JdbcTemplate();
jdbcTemplate.setDataSource(dataSource);
return jdbcTemplate;
}
}
|
使用jdbcTemplate(细节略)
1
2
3
4
5
6
7
8
9
10
11
12
13
14
15
16
17
18
19
20
21
22
23
24
25
26
27
28
29
30
31
32
33
34
35
|
String sql = "insert into t_emp values(null,?,?,?)";
int result = jdbcTemplate.update(sql, "xdy", 23, "男");
String sql = "update t_emp set name=? where id=?";
int result = jdbcTemplate.update(sql, "xdy", 1);
String sql = "delete from t_emp where id=?";
int result = jdbcTemplate.update(sql, 1);
String sql = "select * from t_emp where id=?";
Emp empResult = jdbcTemplate.queryForObject(sql,
(rs, rowNum) -> {
Emp emp = new Emp();
emp.setId(rs.getInt("id"));
emp.setName(rs.getString("name"));
emp.setAge(rs.getInt("age"));
emp.setSex(rs.getString("sex"));
return emp;
}, 1);
String sql = "select * from t_emp where id=?";
Emp emp = jdbcTemplate.queryForObject(sql, new BeanPropertyRowMapper<>(Emp.class), 1);
String sql = "select * from t_emp";
List<Emp> list = jdbcTemplate.query(sql, new BeanPropertyRowMapper<>(Emp.class));
String sql = "select count(id) from t_emp";
Integer count = jdbcTemplate.queryForObject(sql, Integer.class);
|
编程式事务
1
2
3
4
5
6
7
8
9
10
11
12
13
14
15
16
17
18
19
20
21
22
23
| Connection conn = ...;
try {
conn.setAutoCommit(false);
conn.commit();
} catch(Exception e){
conn.rollBack();
} finally{
conn.close();
}
|
框架可以将固定模式抽取出来,进行封装
声明式事务
记得先配置好事务管理(前面有)
@Transactional注解可以标注在类或者方法上
只读操作
1
| @Transactional(readOnly = true)
|
超时回滚
1
| @Transactional(timeout = 3)
|
回滚策略
针对具体的异常
1
2
3
4
5
6
7
|
@Transactional(rollbackFor = ArithmeticException.class)
@Transactional(rollbackForClassName ="java.lang.ArithmeticException")
@Transactional(noRollbackFor = ArithmeticException.class)
@Transactional(noRollbackForClassName ="java.lang.ArithmeticException")
|
隔离级别
READ_UNCOMMITTED:有脏读的问题(读到了未提交的数据)
READ_COMMITTED:有不可重复读的问题(前后两次读取结果不同)
REPEATABLE_READ:有幻读的问题(前一次查询没有,后一次查询又有了)
1
2
3
4
5
6
7
8
9
| @Transactional(isolation = Isolation.DEFAULT)
@Transactional(isolation = Isolation.READ_UNCOMMITTED)
@Transactional(isolation = Isolation.READ_COMMITTED)
@Transactional(isolation = Isolation.REPEATABLE_READ)
@Transactional(isolation = Isolation.SERIALIZABLE)
|
传播行为
A设定了事务,B也设定了事务。A方法中调B方法,事务是如何传递的:
REQUIRED:没有就新建,有就加入SUPPORTS:有就加入,没有就不管了(以非事务方式运行)MANDATORY:有就加入,没有就抛异常REQUIRES_NEW:不管有没有,直接开启一个新事务,开启的新事务和之前的事务不存在嵌套关系,之前事务被挂起NOT_SUPPORTED:挂起当前事务,以非事务方式运行NEVER:不支持事务,存在就抛异常NESTED:有事务的话,就嵌套一个独立的事务,嵌套的事务可以独立提交和回滚。没有事务的话和REQUIRED一样
1
2
3
4
5
6
7
8
|
@Transactional
public void checkout(Integer[] bookIds, Integer userId) {
for (Integer bookId : bookIds) {
buyBook(bookId, userId);
}
}
|
REQUIRED:加入原有事务,只要有一本买不起,就全购买失败
1
2
3
4
5
|
@Transactional(propagation = Propagation.REQUIRED)
public void buyBook(Integer bookId, Integer userId){
checkoutService.checkout(bookIds, userId);
}
|
REQUIRES_NEW:开启新事务,可以一直买书到买不起为止
1
2
3
4
5
|
@Transactional(propagation = Propagation.REQUIRES_NEW)
public void buyBook(Integer bookId, Integer userId){
checkoutService.checkout(bookIds, userId);
}
|
资源操作Resource
给予了访问low-level资源的能力
Resource接口
1
2
3
4
5
6
7
8
9
10
11
12
13
14
15
16
17
18
19
20
21
22
23
24
25
26
27
28
29
30
31
32
33
34
35
36
| public interface Resource extends InputStreamSource {
boolean exists();
boolean isReadable();
boolean isOpen();
boolean isFile();
URL getURL() throws IOException;
URI getURI() throws IOException;
File getFile() throws IOException;
ReadableByteChannel readableChannel() throws IOException;
long contentLength() throws IOException;
long lastModified() throws IOException;
Resource createRelative(String relativePath) throws IOException;
String getFilename();
String getDescription();
}
|
Resource接口继承了InputStreamSource接口
1
2
3
4
5
| public interface InputStreamSource {
InputStream getInputStream() throws IOException;
}
|
Resource实现类
UrlResource
用来访问网络资源,它支持URL的绝对路径
- http: 访问基于HTTP协议的网络资源
- ftp: 访问基于FTP协议的网络资源
- file: 从文件系统中读取
1
2
3
4
5
6
7
8
9
10
11
12
13
14
15
16
17
18
19
20
| try {
UrlResource resource = new UrlResource("http://www.baidu.com");
String filename = resource.getFilename();
URL url = resource.getURL();
String description = resource.getDescription();
InputStream inputStream = resource.getInputStream();
byte[] allBytes = inputStream.readAllBytes();
String s = new String(allBytes);
} catch (IOException e) {
throw new RuntimeException(e);
}
|
1
2
3
4
5
6
7
8
9
10
11
12
13
14
15
16
17
18
19
20
| try {
UrlResource resource = new UrlResource("file:C:/test.txt");
String filename = resource.getFilename();
URL url = resource.getURL();
String description = resource.getDescription();
InputStream inputStream = resource.getInputStream();
byte[] allBytes = inputStream.readAllBytes();
String s = new String(allBytes);
} catch (IOException e) {
throw new RuntimeException(e);
}
|
ClassPathResource
用来访问类加载路径下的资源,可自动搜索位于 classes 下的资源文件,无须使用绝对路径访问
1
| ClassPathResource resource = new ClassPathResource("test.txt");
|
filename:test.txturl:file:/C:/Users/xdy/Desktop/%e5%8d%9a%e5%ae%a2/LearnSpring6/target/classes/test.txtdescription:class path resource [test.txt]
FileSystemResource
用来访问文件系统资源(并没有太大的优势,因为File 类也可访问文件系统资源)
1
2
3
4
5
|
FileSystemResource resource = new FileSystemResource("test.txt");
FileSystemResource resource = new FileSystemResource("C:/test.txt");
|
ServletContextResource
这是ServletContext资源的Resource实现,依赖于Servlet容器
1
| ServletContextResource src = new ServletContextResource(application, "WEB-INF/book.xml");
|
是给定的输入流InputStream的Resource实现。在没有特定的资源实现的时候使用。与其他Resource实现相比,这是已打开资源的描述符。 因此,它的isOpen()方法返回true。
1
2
3
|
InputStreamResource inputStreamResource =
new InputStreamResource(new FileInputStream(new File("C:\\dir\\application.xml")));
|
ByteArrayResource
字节数组的Resource实现类。通过给定的数组创建了一个ByteArrayInputStream。它对于从任何给定的字节数组加载内容非常有用,而无需求助于单次使用的InputStreamResource。
1
2
| byte[] bytes = new byte[] {127, -128, 0, 22};
ByteArrayResource resource = new ByteArrayResource(bytes);
|
ResourceLoader接口
该接口getResource方法,可用于获得一个Resource实例。ApplicationContext即实现了这个接口。Spring将采用和ApplicationContext相同的策略来访问资源。
- 如果
ApplicationContext是FileSystemXmlApplicationContext,resource就是FileSystemResource实例; - 如果
ApplicationContext是ClassPathXmlApplicationContext,resource就是ClassPathResource实例;
1
2
3
4
| ApplicationContext context = new AnnotationConfigApplicationContext(MyConfig.class);
Resource resource = context.getResource("test.txt");
|
当Spring应用需要进行资源访问时,实际上并不需要直接使用Resource实现类,而是调用ResourceLoader实例的getResource()方法来获得资源,ReosurceLoader将会负责选择Reosurce实现类,从而将应用程序和具体的资源访问策略分离
另外,使用ApplicationContext访问资源时,可通过不同前缀指定强制使用指定的ClassPathResource、FileSystemResource等实现类
1
2
3
| Resource res = ctx.getResource("calsspath:bean.xml");
Resrouce res = ctx.getResource("file:bean.xml");
Resource res = ctx.getResource("http://localhost:8080/beans.xml");
|
ResourceLoaderAware接口
该接口有setResourceLoader()方法。该方法将由Spring容器负责调用,会将一个ResourceLoader对象作为该方法的参数传入。
把实现ResourceLoaderAware接口的类放在容器中,Spring容器会将自身作为setResourceLoader()方法的参数传入。(ApplicationContext实现了ResourceLoader接口)
1
2
3
4
5
6
7
8
9
10
11
12
13
14
| @Component
public class TestBean implements ResourceLoaderAware {
private ResourceLoader resourceLoader;
@Override
public void setResourceLoader(@Nonnull ResourceLoader resourceLoader) {
this.resourceLoader = resourceLoader;
}
public ResourceLoader getResourceLoader(){
return this.resourceLoader;
}
}
|
1
2
3
| TestBean bean = context.getBean(TestBean.class);
ResourceLoader resourceLoader = bean.getResourceLoader();
Resource resource = resourceLoader.getResource("/test.txt");
|
依赖注入Resource
Resource可以以字符串形式进行依赖注入,使用file:,http:,ftp:等前缀强制Spring采用对应的资源访问策略。无前缀,则将采用与ApplicationContext相同的资源访问策略
1
2
3
4
5
6
7
8
9
10
11
12
13
14
15
16
17
| @Component
public class ResourceBean {
@Value("classpath:test.txt")
private Resource res;
public void setRes(Resource res) {
this.res = res;
}
public Resource getRes() {
return res;
}
public void parse() throws IOException {
System.out.println(new String(res.getInputStream().readAllBytes()));
}
}
|
数据校验Validation
在开发过程中,我们经常遇到参数需要校验的需求,比如用户的电话,邮箱等等。Spring Validation是对Hibernate Validator的进一步的封装,方便在Spring中使用。
Spring中的校验方式:
- 实现Validator接口,然后在代码中调用这个类
- 按照Bean Validation方式(即注解方式)
- 基于方法实现校验
Validator接口
导入依赖
1
2
| hibernate-validator
jakarta.el
|
实体类
1
2
3
4
5
6
| public class Person {
private String name;
private int age;
}
|
创建Validator实现类
- support方法用来判断支持的类型
- validate方法设置检验的逻辑,其中ValidationUtils是Spring封装的校验工具类,帮助快速实现校验
1
2
3
4
5
6
7
8
9
10
11
12
13
14
15
16
17
| public class PeopleValidator implements Validator {
@Override
public boolean supports(Class<?> clazz) {
return People.class.equals(clazz);
}
@Override
public void validate(Object target, Errors errors) {
ValidationUtils.rejectIfEmpty(errors, "name", "name.empty");
People p = (People) target;
if (p.getAge() < 0) {
errors.rejectValue("age", "error value < 0");
} else if (p.getAge() > 110) {
errors.rejectValue("age", "error value too old");
}
}
}
|
使用校验
1
2
3
4
5
6
7
8
9
10
11
12
13
14
15
16
17
|
People people = new People();
people.setName("xdy");
people.setAge(-1);
DataBinder binder = new DataBinder(people);
binder.setValidator(new PeopleValidator());
binder.validate();
BindingResult result = binder.getBindingResult();
System.out.println("result.getAllErrors() = " + result.getAllErrors());
|
Bean Validation注解
需要将ValidatorFactory和Validator注入到容器中。Spring中默认有一个实现类LocalValidatorFactoryBean,实现了上述接口。
1
2
3
4
5
6
7
8
9
| @Configuration
@ComponentScan("org.example")
public class MyConfig {
@Bean
LocalValidatorFactoryBean localValidatorFactoryBean() {
return new LocalValidatorFactoryBean();
}
}
|
实体类使用注解定义校验规则
1
2
3
4
5
6
7
8
9
10
11
| public class People {
@NotNull
private String name;
@Min(0)
@Max(120)
private Integer age;
}
|
| 注解 | 作用 |
|---|
| @NotNull | 限制必须不为null |
| @NotEmpty | 只作用于字符串类型,字符串不为空,并且长度不为0 |
| @NotBlank | 只作用于字符串类型,字符串不为空,并且trim()后不为空串 |
| @DecimalMax(value) | 限制必须为一个不大于指定值的数字 |
| @DecimalMin(value) | 限制必须为一个不小于指定值的数字 |
| @Max(value) | 限制必须为一个不大于指定值的数字 |
| @Min(value) | 限制必须为一个不小于指定值的数字 |
| @Pattern(value) | 限制必须符合指定的正则表达式 |
| @Size(max,min) | 限制字符长度必须在min到max之间 |
| @Email | 验证注解的元素值是Email,也可以通过正则表达式和flag指定自定义的email格式 |
方法一:使用jakarta.validation.Validator校验
1
2
3
4
5
6
7
| @Autowired
private Validator validator;
public boolean validatePeople(People people) {
Set<ConstraintViolation<People>> violations = validator.validate(people);
return violations.isEmpty();
}
|
方法二:使用org.springframework.validation.Validator校验
1
2
3
4
5
6
7
8
9
| @Autowired
private Validator validator;
public boolean validatePeople(People people) {
BindException bindException = new BindException(people, people.getName());
validator.validate(people, bindException);
return bindException.hasErrors();
}
|
基于方法实现校验
向容器中配置MethodValidationPostProcessor
1
2
3
4
5
6
7
8
9
| @Configuration
@ComponentScan("org.example")
public class MyConfig {
@Bean
public MethodValidationPostProcessor validationPostProcessor() {
return new MethodValidationPostProcessor();
}
}
|
实体类上使用注解定义校验
1
2
3
4
5
6
7
8
9
10
11
| public class People {
@NotNull
private String name;
@Min(0)
@Max(120)
private Integer age;
}
|
在需要使用的地方,通过注解标注函数参数(类需要加上@Validated注解)
1
2
3
4
5
6
7
8
| @Service
@Validated
public class PeopleService {
public String testParams(@NotNull @Valid People people) {
return people.toString();
}
}
|
使用时,如果校验不通过,会抛出ConstraintViolationException错误
1
| String s = peopleService.testParams(people);
|
实现自定义校验
编写校验逻辑,实现ConstraintValidator接口
1
2
3
4
5
6
7
8
9
10
11
12
13
14
15
16
17
18
19
20
21
22
23
24
| public class CannotBlankValidator implements ConstraintValidator<CannotBlank, String> {
@Override
public void initialize(CannotBlank constraintAnnotation) {
ConstraintValidator.super.initialize(constraintAnnotation);
}
@Override
public boolean isValid(String value, ConstraintValidatorContext context) {
if (value.contains(" ")) {
String template = context.getDefaultConstraintMessageTemplate();
System.out.println("template = " + template);
context.disableDefaultConstraintViolation();
context.buildConstraintViolationWithTemplate("can not contains blank").addConstraintViolation();
return false;
}
return true;
}
}
|
编写自定义注解
1
2
3
4
5
6
7
8
9
10
11
12
13
14
15
16
17
18
19
20
21
22
23
| @Target({ElementType.METHOD, ElementType.FIELD, ElementType.ANNOTATION_TYPE, ElementType.CONSTRUCTOR, ElementType.PARAMETER})
@Retention(RetentionPolicy.RUNTIME)
@Documented
@Constraint(validatedBy = {CannotBlankValidator.class})
public @interface CannotBlank {
String message() default "不能包含空格";
Class<?>[] groups() default {};
Class<? extends Payload>[] payload() default {};
@Target({ElementType.METHOD, ElementType.FIELD, ElementType.ANNOTATION_TYPE, ElementType.CONSTRUCTOR, ElementType.PARAMETER, ElementType.TYPE_USE})
@Retention(RetentionPolicy.RUNTIME)
@Documented
@interface List {
CannotBlank[] value();
}
}
|
List的写法让我们可以在参数上标注多个相同注解(此处没什么用,仅作展示)
1
2
3
4
5
| @CannotBlank.List({
@CannotBlank(),
@CannotBlank()
})
private String name;
|